
Hallberg Rassy Rasmus 35
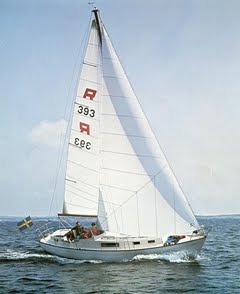
An Old Classic
Tuesday, December 27, 2011
Rasmus Web Site and Blog Audience
Friday, December 23, 2011
2012 To do List
 |
| My first cruise in a 16 foot McKenzy River Dory along Mississippi's Barrier Islands. |
Tuesday, December 13, 2011
Inner Forestay for the Rasmus
I have been talking to Mack Sails about new sails and they have just about talked me into putting in an inner forestay for a small jib and storm sail. I kinda wanted one anyway. I have just sent them a design idea and I am waiting for a response. Here is a quick sketch I sent them to see if it is feasable.


Tiny Tot Installation Photos
Below are photos of tht Tiny Tot installation.
 |
| I had to cut a six inch dia. hole for the Navigator built bronze thru hull for the pipe. Shown is the cloverleaf pipe cap. |
 |
| Here is a closer look at the well made bronze thru hull. |
 |
| I placed it on the forward sette, so I made it easily removeable. The long pipe provides great radiant heat and nice draft. |
 |
| Close up of the Tiny Tot. I will bolt it to the tile and hinge the two tile pieces so I can fold them together for storage. |
 |
| I used a stainless steel band off of a fernco coupling to attach the pipe to the thru hull. I can loosen it and slide it down over the pipe to remove the stove easily. I also used two 45 degree pipe fittings in order to accomodate the angled roof. One is used to below the roof and one above the roof, keeping everything nice a plumb. This allowed me to mount the bronze thru hull flush with the roof without having to build a wooden block to mount it on. This way it is less obtrusive when the pipe is put away and eliminate another possible leak source. |
Monday, December 12, 2011
Tiny Tot Heater
I have just installed a Tiny Tot charcoal heating stove and I love it. I set it up so I could easily remove it and stow it because I located it on the forward sette and I will not be sailing in cold climates all that often. I installed a Navigator built bronze thru hull for the stove pipe and it can easily be plugged. It is a beautiful piece of hardware. The stove creates a cozy atmosphere, heats the area nicely, and gives off just enough aroma to please. Pictures to come.
Friday, November 25, 2011
Bilge Pumps and Anchor System
After reading Euan's post about his anchor setup, I rethought (I am bad about that) my system and decided to set it up like Euan's. It wouldn't take much effort and I figured the benefits would be worth it. I raised my windlass up 2.5 inches on a teak block, drilled a 2 inch hole in my chain locker hatch, mounted a hawse pipe in the hole, and bolted a roller in front of the hawse pipe. It works really well with very smooth operation with no hangups. If one should occur, everything is accessible at the windlass. Pics below:
I finished the bilge pump setup. I installed two electric bilge pumps, one 1100 gal/min primary which is mounted on the bilge floor(actually I bonded a false floor on in the bilge made of g10 frp and mounted all screws and bolts to it for attachment of pumps), a 3800 gal/min secondary pump mounted 3 inches above the bilge floor in case the primary gets overwhelmed, and a manual pump with handle in cockpit. Each pump has its own thru hull and siphon loop. The only problem I have with the system is that in a situation where the primary fails, and the secondary kicks in, the back flow of water from the filled bilge hose into the bilge after the secondary kicks off will cause the secondary pump to cycle on and off continuously. Not good. I don't want to put check valve in the system but may have to. Pics below.

 |
| Anchor setup |
 |
| The chain is led forward over the roller and into the chain locker. I can also stow the chain under the forward berth on longer passages. There is a fuel fill cap under the windlass for getting the chain under the forward berth. |
 |
| I can access the locker by engaging the chain stopper on anchor platform, unhooking the chain from the windlass, and opening the hatch. |
 |
| The chain locker hatch open. |
I finished the bilge pump setup. I installed two electric bilge pumps, one 1100 gal/min primary which is mounted on the bilge floor(actually I bonded a false floor on in the bilge made of g10 frp and mounted all screws and bolts to it for attachment of pumps), a 3800 gal/min secondary pump mounted 3 inches above the bilge floor in case the primary gets overwhelmed, and a manual pump with handle in cockpit. Each pump has its own thru hull and siphon loop. The only problem I have with the system is that in a situation where the primary fails, and the secondary kicks in, the back flow of water from the filled bilge hose into the bilge after the secondary kicks off will cause the secondary pump to cycle on and off continuously. Not good. I don't want to put check valve in the system but may have to. Pics below.
 |
| Bilge pumps mounted to false floor |
 |
| Siphon loop for each pump. The siphon vents are connected to each other with a 3/16 inch hose. |
 |
| Manual whale pump mounted with handle led to cockpit. |
 |
| I used a fuel fill cap to cover the hole for the manual pump handle. It makes for a neat and water tight installation. |

Wednesday, November 23, 2011
To do list


Anchoring System
I used Euan's idea of directing the anchor chain around the windlass and back forward, entering the chain locker from the hatch. I raised my windlass up 2.5 inches off the deck and placed a small roller in front of the hawse pipe mounted on the hatch. It works really smooth with not a hangup anywhere. Thanks for the great idea Euan! I'll post some pictures soon. I also just finished installing 3 bilge pumps, one smaller 1100 gal/min primary, one 3800 gal/min secondary(just in case the primary is overwhelmed. It is mounted 3 inches off the bilge floor) and one manual with the handle located in the cockpit. I'll post some pics of that setup as well soon.
Happy Holidays
Pat
Happy Holidays
Pat

Wednesday, November 16, 2011
My sails
Been reading Windtraveller about how they got stuck in a squall but not quite sure what Scott has for a foresail.
We have flatter water and slack tides in the sea lochs around us so get the opportunity to sail in stronger winds on a regular basis without being exposed to open ocean. As such, I have had the opportunity to be out in a F7 gusting 8 on a regular basis. Having experience what Scott did with my rail down under two reefs I had a third set of reefing points put into my main sail.
I only have two permanant reefing lines run in but they are on an adjustable track on the side of the boom. As such, I can shuffle them easily before I go out so I reef either 1&2 or 2&3. Not perfect but our forecasts are good so its works for me.
I use a no 2 120% overlapping genoa as my normal foresail but also carry a heavy duty working jib / no 3. It came with the boat and originally was hank on. I have a roller so have had a luff wire added so I can pull off the genoa and replace it with the jib.
If we go out in stiff winds the combination of heavy duty jib and third reef is just perfect. The sails set flatter and work much more efficiently in those conditions.
Tom Mair is cruising on his Nab35, El Viento, and I have followed his email letters regularly. He has the ability to set a removable inner forestay just behind his roller and runs his heavy duty jib up that. He also has a cruising chute which he swears by for light winds in the Med. Its still on my wish list as we have a spinnaker which get out occasionally.
Would be interested to hear what combinations you all have and how it works for you in differing wind strengths.
Tuesday, November 8, 2011
Conduit for Mast Wires
I have read of boat owners drilling and riveting pvc conduit on the inside of the mast to run wires for lights and other instruments. I really didn't want to drill holes so today I glued pvc conduit on the inside of the mast instead of using rivets. I roughed up 8 areas on the pvc pipe about the size of a playing card 4 feet apart all on one side of the pipe. As I pushed the pipe into the mast(lying with the bow side of the mast down) I applied a golf ball size glob of 3M 5200 on the roughed up areas on the top side of the pipe. Keeping the globs of 5200 on the top side of the pvc pipe, I slid the pipe all the way into the mast. When it was in the right position I turned it until the 5200 contacted the mast and gave it a little jiggle to set it in place. We shall see how this works.
Cheers
Pat
Cheers
Pat
Monday, October 31, 2011
Rebuilding the Mast: Help!
Its been so long I have forgotten how the mast goes together. I am hoping some of you Rasmus owners can help me out. I don't know what fasteners were used to bolt the spreaders to the mast and the orientation of the shroud tangs.
BOW(forward)

STEARN(aft)
BOW(forward)

STEARN(aft)
Is the lower attachment point on the tang aft or forward (above)?


So I have 4 fasteners on each spreader that are in question. The 2 fasteners that bolt the U shaped hardware to the mast and the 2 fasteners that bolt the spreader to the U shaped hardware.
Help would be greatly appreciated!
Cheers
Pat
Thursday, October 27, 2011
Anchor Platform Completed
 |
| Completed Anchor Platform |
 |
| It can hold a #35 lb Delta and Fortress side by side. |
 |
| Backing plate for anchor platform using 1/2 thick G10 plate bedded in epoxy/wood flour mix. |
Tuesday, October 25, 2011
Reefing the Mainsail
I would like to know how Rasmus owners are reefing their mainsail. Is anyone using the original roller reefing boom? And if so, what are the advantages and disadvantages? Anyone using jiffy reefing? I would like to hear any comments on Rasmus owners system of reefing the mainsail and the advantages and disadvantages of each. I am trying to decide which direction to go in this matter. Thanks for any info.
Cheers
Pat
Cheers
Pat
Thursday, October 20, 2011
Hello from 1974 Rasmus 35 #277

Aero was a named after an Island in Denmark. I'm waiting for a compelling reason to rename her. I'm open to your opinion/reaction. One of my favorite mythical characters is SEDNA, the Tlingit/Haida Mother of the Sea Mammals. Seems like a good name, but Sedna was thrown overboard by her father for refusing suitors and when she grabbed the rail of the umiak he chopped off her fingers which became the seals, whales, etc. Hmmmm, not sure we want to sink to the bottom of the sea. I'm also quit fond of Crows/Ravens. . . Tlingit/Haida for Raven would be YETL.
I'm anxious to learn as much as possible from other's experiences with their Rasmus, so please drop a line. I also have a stale blog at http://jimbononno.blogspot.com/
jimbononno
Wednesday, October 19, 2011
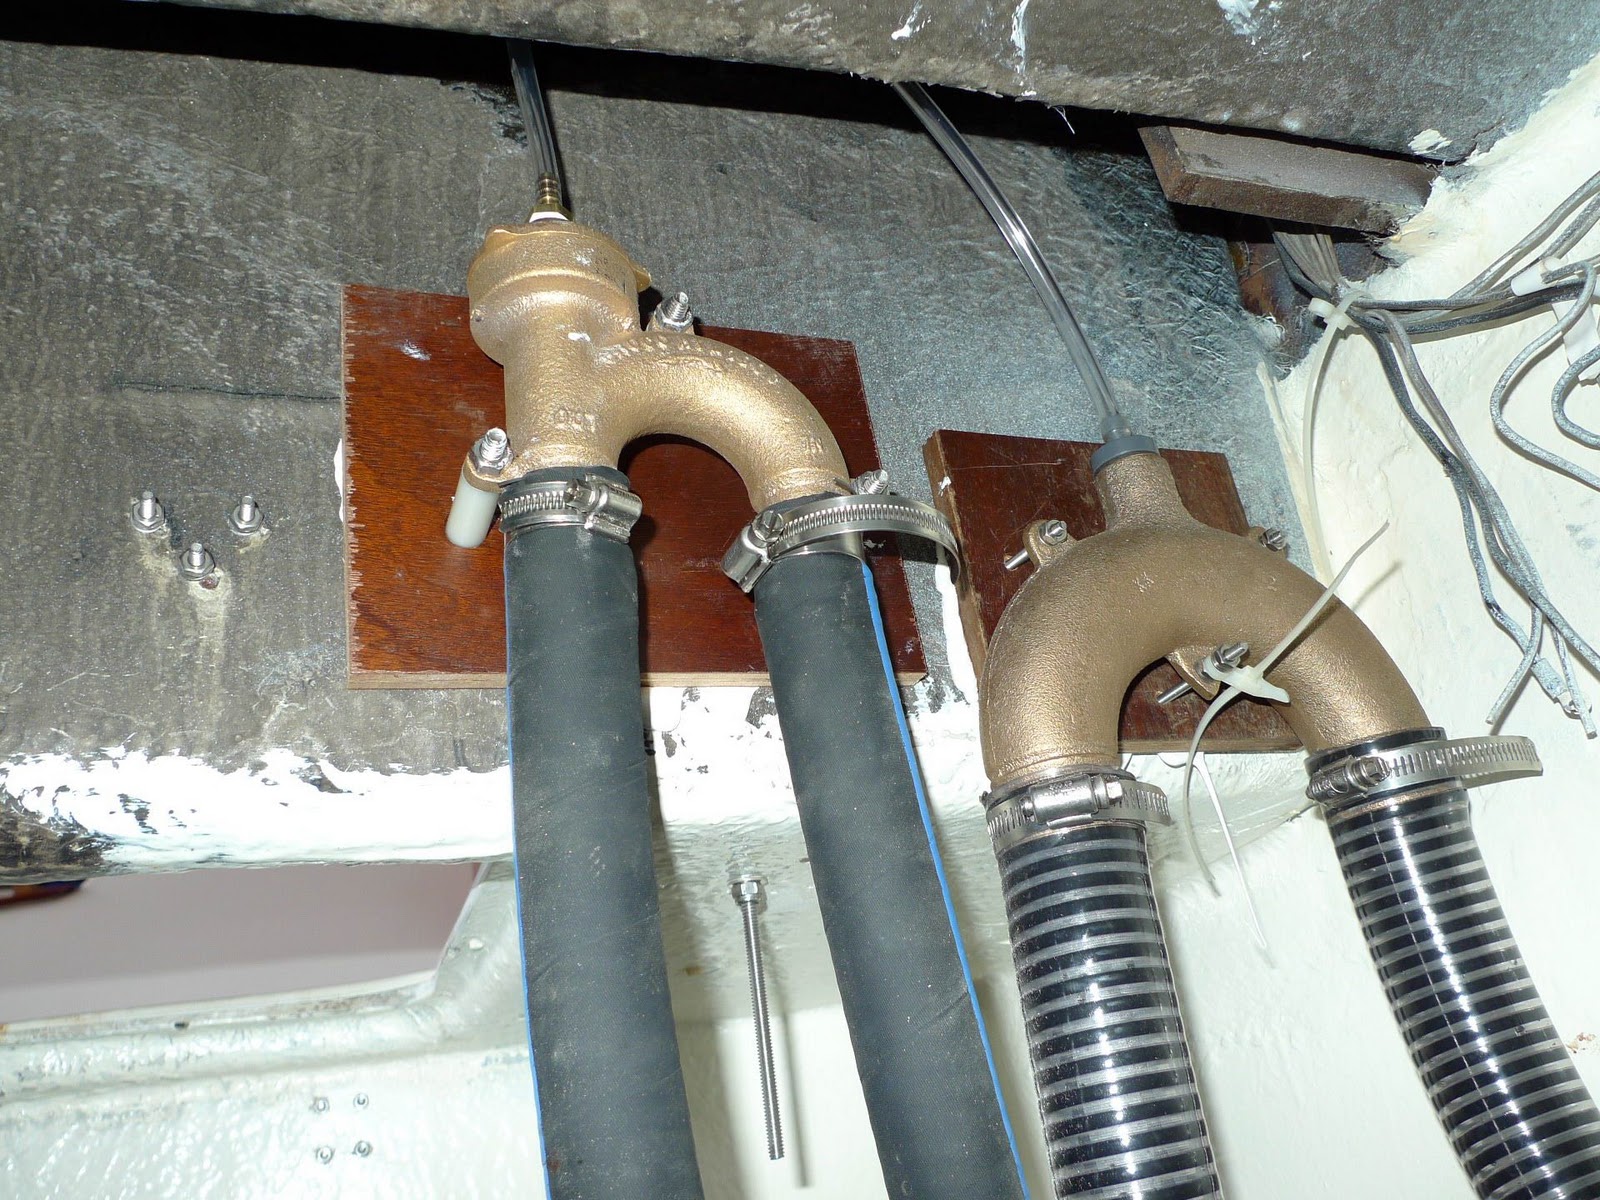
Update: Head, Bilge Pumps, Galley
I thought I would post pictures of the latest work. The head is nearing completion, the bilge pumps are mounted, and galley work progressing. I am within a few days of starting the windshield and hardtop and will install the pushpit and anchor platform as soon as the bolts arrive. Pics below.
 |
| New galley |
 |
| New sink installed and old spigot recycled. |
 |
| Don't know what this is called but I am thinking it is used as a place to attache a stilt when lying aground during low tide. Correct me if I am wrong. |
 |
| Bilge pump thru hull |
 |
| Galley looking in from cockpit |
Tuesday, October 11, 2011
Rasmus Progress: New Anchor Setup, New Head, and Closet
This past week I have been working on the anchor platform setup, the head, and the closet. I have nearly completed all of these task with pictures below.
\
 |
| The beefed up anchor platform base. Two inch teak bonded to hull with 3/8 inch bronze bolts to hold it in place. |
 |
| Here is a peek at the new head. |
 |
| The new head with a Natures Head composting toilet. |
 |
| The remodeled closet. |
 |
| I had to build three new shelves for under the head sink. |
Friday, September 23, 2011
Custom Hardtop/Dodger
Hello Rasmus Owners,
I am in the process of designing and building hardtop/dodger and I am trying to get as close to the factory dimensions as possible. If any merciful soul out there has a Hallberg Rassy factory built hardtop I would love to get a couple of measurements off of you.
1. The length from the center and bottom of the forward windshield (where the dodger sits on the dodger step) to the bottom of the hardtop roof (following the angle of the windshield).
2. The length from the bottom (where the dodger sits on the dodger step) of the corner where the front windshield ajoins the diagonal windshield to the bottom of the hardtop roof (following along the intersection of the front and diagonal windshields).
3. The length from the bottom (where the dodger sits on the dodger step) of the corner where the diagonal windshield ajoins the side windshield to the bottom of the hardtop roof (following along the intersection of the diagonal and side windshields).
4. The length from the bottom of the side windshield (where the dodger sits on the dodger step) following the stearn end of the harddodger to the bottom of the hardtop roof (following the angle of the windshield).

The measurements don't have to be supremely accurate. To the nearest quarter inch would be fine. I just need a rough guideline. Well, not too rough. Thanks to anyone that can lend me a hand on this project. I will post the work at http://www.lizardheadone.com/
Monday, September 19, 2011
Price for New Windshield for the Rasmus
I am in the process of designing/fabricating a new windshield/hard top for my Rasmus. I was curious and requested a quote from Hallberg Rassy a while back and they just sent me the figure. Are you ready? It came out to 36,000 SEK or $5,430.00 plus shipping and VAT charges. With some time and effort I think I can build one for under $600.00. My plan is to use 1/4 inch thick by 1 1/2 inch wide 316 stainless steel bar stock that I just ordered from the internest for around $300.00. I will make a jig so the welder can weld the bar stock into the shape of the original frame. I will then add wood to the sides of the bar stock to hold the glass or plastic windows and bolt on the hardtop. My plan is to make the hardtop removable without too much effort. I was going to make it out of plywood and fiberglass but decided that I didn't want to do all that epoxy/fiberglass work. I am hoping this current design will be easier and better looking.
This is the email from Hallberg Rassy:
1. Regarding the windscreen: I´ve talked to our supplier and he want the old windscreen sent to him in sections so that he can use them as a template. This is because the parts are asymmetric, so there are 5 different sizes/malls for the 5 diiferent windscreen parts. The fixingrails has to be fitted in by You. Price for the Windscreen is 36,000 Sek. ex VAT. Shipping cost will be added because I have no idea how the parts will be packed from our supplier.
2. Cutlass bearing. I know that the shaft is 30mm. Price for the 30mm. bearing is, 737 Sek. ex VAT. The outher diameter is 44,45mm. and the length is 127mm. Can You please check this on the boat. You might have to cut the cutlass bearing.
VOLVO part number is 812916.
Wednesday, September 14, 2011
Removing the Cutlass Bearing on the Rasmus
I thought I was going to be clever and fashion a custom tool to remove the bearing for a few bucks, so I went to Home Depot and bought some all thread, washers, and nuts and went home to quickly crank the bearing right out. Like most projects on this boat, reality is much more difficult than theory. The problem is that on the Rasmus's propeller shaft log has a restriction very near the inward end of the cutlass bearing that has nearly the same diameter as the cutlass bearing. This restriction eliminates the possibility of using washers and all thread to remove the bearing. So, I used the old tried and true method of hacking, banging, chipping, chiseling, and cursing the damn thing out. That is not far from the truth, however, here is a bit more detail. I used a reciprocating saw with a metal cutting blade and carefully cut a groove nearly all the way through the bearing at the six oclock position. If you wanted to make the job much easier and didn't mind scoring the inside of your shaft log you could cut all the way through the brearing, but I did not want to do that for obvious reasons. Then I cut another groove nearly all the way through the bearing at the nine oclock position. Now, here is the fun part. I got a sharp 1/2 inch wood chisel and tapped the edge of the bearing near the groove being careful to stay clear of the log(the log is soft and that hardened chisel will do a number on it). The wood chisel will grab the soft brass bearing and you should be able to get the bearing to work away from the log. I kept pounding the bearing between the two groove I cut curling the bearing surface back towards the inside of the log. At one point the bend of the bearing was getting so large it was hitting the other side of the bearing. At that point I used my chisel and pound it until I had cut the curling piece of bearing off. I did this until the entire bearing between the two grooves I cut was out. At this stage I just used my chisel to pound the bearing surface away from the log being very careful to keep the chisel off of all log shaft surfaces. It took a lot of pounding and cursing, but it worked without damaging the shaft log. It might be easier to cut the grooves closer together, say in the 6 oclock to 7 oclock position. That way there would be less bearing metal to bend over and cut as you pounded it back. You also must be very careful about the length of your cut. It is hard to see the blade as it reciprocates, thus, it's hard to see just how far in you are cutting. Good Luck!
I just got an email from Hallberg Rassy (above post) and the cutlass bearing for the rasmus measures: Outside diameter = 44 to 45mm
Propeller Shaft diameter = 30 mm
Length = 127mm
Cost = $112 from Hallberg Rassy
I just got an email from Hallberg Rassy (above post) and the cutlass bearing for the rasmus measures: Outside diameter = 44 to 45mm
Propeller Shaft diameter = 30 mm
Length = 127mm
Cost = $112 from Hallberg Rassy
Monday, September 12, 2011
Bottom Paint On

Wednesday, August 31, 2011
Changing from Hydraulic steering to Edson wire steering
I am considering making this change. If any Rasmus owners have done this I would love to hear from you. What Edson parts does it take to make the change and about how much will it cost?
Anchoring system help
I am getting ready to bolt on my windlass and mount the anchor platform on the Rasmus. I would love to hear from Rasmus owners your opinions on how to best set the system up (where to mount the windlass, where to store the chain, etc.).
Sunday, August 21, 2011
Which engine for the Rasmus?
 |
| It needs an engine |
Thursday, July 28, 2011
Let's Make This an Interactive HR Rasmus Owners Blog
In order to make this an interactive forum for Rasmus owners, we need more authors that can post topics on their own terms. This blogspot will support up to 100 authors. That would reallly get the ball rolling. You can email a message to me at http://www.lizardheadone.com/contact-us.html that you would like to participate in authorship of this blog. The blogspot will then send an automated message to you asking if you would like to contribute in authorship. Let's get this going HR Rasmus owners.
Friday, July 15, 2011
Introduction to you all

Hi to you all
I am Euan and I own HR Rasmus 126 named Cabatach. Its from 1972 and we keep it on a swinging mooring at the top of the Kyles of Bute in Scotland in a village called Tighnabruaich. It's is a sloop, and largely unrestored and original including still having the 35 year old Volvo it came with.
I kept the name when I got the boat. I'm not really sure what it means but I think it is Gaelic.
I bought the boat primarily for family cruising and it is brilliant for that. What we did last weekend is typical and if you look on google maps you can follow it.
Me and my neighbour Pete took four kids with us and went for the weekend. We sailed out from our mooring to Lochranza at the NW side of the Isle of Arran for a late lunch. It was blowing
about F5 but sunny and reasonably warm. We had one reef in and the wind swung from NW to W bringing us almost hard on to the wind as we came into the start of the Kilbrannan sound. We were doing between 5 & 6 knots most of the way.
We picked up a free mooring at Lochranza about 2pm and had a late lunch before going ashore to let the kids stretch their legs and play on the shore. Iona my youngest is 8 and went paddling.
About 5 we headed north up Loch Fyne to Portavadie Marina for the night. We got out the gas barbie and did burgers and sausages all round. Next morning we woke to a little haze and the sun broke through about 11. We SE headed towards home, back down Loch Fyne round Ardlamont point and up the West Kyle to out mooring. It was F2-3 NNW so we broke out the kite and the added boost gave us near 5 knots.

The wind hardened again to the North in the West Kyle and we really needed a reef. Being lazy, we motored the last few miles while we stowed the sails and tidied the boat etc.
We had no rain all weekend, novel for here, and all went home happy. I guess it typified what we'd like to do more often but the weather isn't that consistent in Scotland.
First Post - Its all very different from some of the rest of you but a great boat for it nonetheless! I'll tell you more about my actual boat in another post if you find this interesting.
Euan from Cabatach
Sunday, July 10, 2011
Adventure Around the Corner

We had a great hike, 9 days and 120 miles of mountain travel. Description of hike at The Portal
Saturday, July 9, 2011
Let's Make This An Interactive Rasmus Owners Blog
In order to make this an interactive forum for Rasmus owners, we need more authors that can post topics on their own terms. This blogspot will support up to 100 authors. That would reallly get the ball rolling. You can email a message to me at http://www.lizardheadone.com/contact-us.html that you would like to participate in authorship of this blog. The blogspot will then send an automated message to you asking if you would like to contribute in authorship. Let's get this going HR Rasmus owners.
Friday, July 8, 2011
HR Rasmus Rudder Disassembly Instructions

A Swedish Rasmus owner sent this diagram to me. It shows the correct disassembly of the Rasmus rudder.
North American Sailor gives Hallberg Rassy's Rasmus Runner Up Honors
I googled "Hallberg Rassy" the other day and came across a February 15, 2011 posting in North American Sailor internet magazine on the best racing and cruising boat under $50,000. It seems the author picked Hallberg Rassy's Rasmus as the runner up in the cruising division. As I read through the description I noticed that the author had referenced another web page which gave a good example of an extensive rebuild of this classic cruiser. I clicked on the site and what do you know, it was mine. Here is the link to the article.
http://nasailor.com/2011/02/15/what-is-the-best-racing-boat-and-cruising-boat-for-under-50000/
http://nasailor.com/2011/02/15/what-is-the-best-racing-boat-and-cruising-boat-for-under-50000/
Sailing Characteristics of the Hallberg Rassy Rasmus
I would like to hear from all of the HR Rasmus 35 owners about the sailing characteristics of this model, good and bad.
My thoughts on Restoring a Classic Cruiser

I like this boat (as far as construction goes. I have yet to sail one). It is simple and that was one of the main reason I chose this model to restore. It is built tough. The sail plan is on the low power end, great for solo sailing. And I like the old school looks of the Rasmus. I don't like the fact that it was built in halves, the hydraulic steering, and the iron keel. But overall I am pleased with what I have learned about the construction of this boat through the years of working on it.
I am now in the nitty gritty of keel repair, meaning I will be on my back under the keel pressing fiberglass on the bottom of the keel while epoxy drips all over the place. I will be in long pants and shirt, tyvek suit, hood, and full face respirator in the 100 degree summer heat of Arkansas. It is not much fun. But this is the last of the grunt work and she will look like new by the end of the year with new exterior paint throughout.
Cheers
Wednesday, July 6, 2011
HR Rasmus Restoration
Here is a link to Pat Sixbey's HR Rasmus Restoration web page.
http://www.lizardheadone.com/
http://www.lizardheadone.com/
Subscribe to:
Posts (Atom)